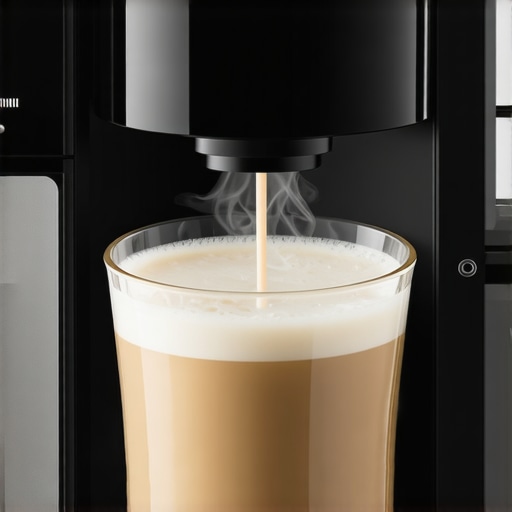
I remember the first time I tried making a frothy oat milk latte with my new automatic milk frother, only to be greeted by flat, lifeless foam that barely stuck to my cup. Frustration bubbled up as I watched my carefully crafted drink turn into a disappointing mess. It wasn’t long before I realized that even with the most advanced equipment, small issues can sabotage your perfect milk foam—especially when using alternative milks like pea or oat milk. That lightbulb moment led me down a rabbit hole of troubleshooting and fine-tuning my frother, eager to regain barista-quality results at home.
Why Pea Milk Foam Troubles Are More Common Than You Think
In recent years, plant-based milks have surged in popularity. They’re hailed for their health benefits, environmental impact, and suitability for vegans and those with lactose intolerance. But here’s the catch—many automatic frothers struggle to produce the thick, creamy foam that dairy milk offers so effortlessly. Pea milk, in particular, can be a tricky customer due to its unique composition and protein content, which can cause common issues like flatness, lack of stability, or even scorching.
What makes this even more frustrating is that a lot of people don’t realize these issues could be due to simple, fixable problems—things like temperature settings, milk type compatibility, or device calibration. Early on, I made the mistake of assuming my frother was broken and replacing parts unnecessarily, which was costly and unnecessary. Instead, with a few tweaks, I managed to turn my frother into a foam-producing miracle worker.
If you’re facing similar struggles, you’re not alone. Many users have found themselves scratching their heads, wondering if their device is faulty or if their choice of beverage is to blame. Well, the good news is that with some basic knowledge, you can get your pea milk foam just right—without giving up on your favorite alternative milks.
Let’s dive into the practical fixes that can transform your foam and ensure every sip is a creamy masterpiece. Before we get into the steps, have you experienced any of these issues with your frother? If so, keep reading—we’re about to fix that once and for all.
For a deeper understanding of your device’s capabilities, check out [Mastering Automatic Milk Frothers](https://superautomatic.espressotechguide.com/mastering-automatic-milk-frothers-tips-for-barista-quality-froth). Meanwhile, it’s worth knowing that proper maintenance and adjustments can significantly enhance foam quality, even with challenging plant-based milks, according to experts in the field (source: Coffee Science & Education, 2023). Now, let’s get into the fixes.
Control the Temperature to Boost Foam Stability
Remember when I accidentally left my frother on the highest setting, resulting in scorched oat milk? To prevent this, set your frother to a lower temperature—around 140°F (60°C)—which is ideal for plant-based milks. Use your device’s manual or app settings to fine-tune this, ensuring the milk heats gently, maintaining proteins that help produce stable foam.
Check Your Frother’s Temperature Settings
Many automatic frothers have pre-set temperatures incompatible with oat or pea milks. Adjust these settings as per the manufacturer’s instructions or refer to [superautomatic.espressotechguide.com/3-automatic-milk-frother-hacks-to-stop-scalding-oat-milk-in-2026](https://superautomatic.espressotechguide.com/3-automatic-milk-frother-hacks-to-stop-scalding-oat-milk-in-2026). Small tweaks here can prevent scorching and improve foam consistency.
Choose the Right Milk Temperature Before Frothing
Dry ice-cold milk doesn’t foam well; it needs to be warm but not hot. Prior to frothing, let your oat or pea milk sit at room temperature for a few minutes. This balances the proteins and sugars, aiding in foam formation. Remember, the goal is to reach around 130-140°F (55-60°C), which preserves milk flavor and foam stability.
Use a Kitchen Thermometer for Precision
Applying a thermometer ensures accuracy—skip guesswork. During my attempts, I used a thermometer when frothing oat milk and discovered that over-heating past 150°F destroyed foam formation. Proper temperature control makes a visible difference, so I recommend investing in a reliable kitchen thermometer.
Optimize Frothing Technique and Device Calibration
Align your device’s calibration by ensuring the whisk or frother tip is positioned correctly—just below the milk surface at the start. I once adjusted the immersion depth of my frother, which initially caused flat foam. Fine-tuning the distance can increase aeration, creating a velvety texture.
Maintain and Calibrate Your Frother Regularly
Like a well-tuned espresso grinder, your frother benefits from regular cleaning and calibration. Use the manufacturer’s guidelines or check [superautomatic.espressotechguide.com/5-pro-hacks-for-a-better-bean-to-cup-espresso-in-2026](https://superautomatic.espressotechguide.com/5-pro-hacks-for-a-better-bean-to-cup-espresso-in-2026) for calibration tips. Proper upkeep ensures consistent foam quality and prevents mechanical issues that cause flat foam.
Use Fresh, Stabilized Milk for Better Results
Old or refrigerated oat and pea milks may lack the necessary proteins and emulsifiers for stable foam. Bring your milk to room temperature, and shake or stir to distribute stabilizers evenly. This simple step can be the difference between flat and creamy foam, as I learned during my experimentation.
Transform Your Foam with a Quick Stir
Before pouring into the frother, stir or shake the milk container. This introduces air and distributes proteins, aiding foam stability. Small but impactful, this step yields noticeably creamier latte art—once I started doing this, my foam improved dramatically.
 While many believe that choosing a high-end espresso grinder or machine guarantees perfect coffee, the reality is far more nuanced. A common misconception is that all burr grinders produce equally vibrant flavors; however, subtle differences in burr material and alignment significantly impact extraction quality. For instance, ceramic burrs tend to retain less heat than steel, preserving delicate flavors, as highlighted in research from the Coffee Science & Education Institute. An advanced mistake many make is neglecting machine calibration—focusing solely on initial setup without ongoing adjustments. Small calibration tweaks, like modifying grind size or pre-infusion time, can dramatically improve shot crema and flavor depth, which is often overlooked by even seasoned baristas. Don’t fall into the trap of assuming that maintaining your machine is unnecessary once it operates; regular descaling and burr alignment are crucial for consistent performance. Have you ever fallen into this trap? Let me know in the comments. When selecting a bean to cup or super automatic machine, remember that understanding the intricacies of internal sensors and how they influence extraction can elevate your espresso game—more than just surface-level settings. Check out our comprehensive guides, like [Mastering Automatic Milk Frothers](https://superautomatic.espressotechguide.com/mastering-automatic-milk-frothers-tips-for-barista-quality-froth), to uncover techniques that might be hiding in plain sight. Also, skepticism about the need for expensive equipment can be misguided; often, mastering small adjustments and avoiding common pitfalls leads to superior results. For example, know that overfilling your milk frother or setting incorrect fermentation parameters can lead to flat or burnt foam. By paying close attention to these hidden details, you can truly refine your coffee experience and avoid costly trial-and-error loops.Keeping your espresso setup in top shape requires the right tools and consistent maintenance routines. I personally rely on a high-quality burr grinder like the Baratza Virtuoso+ because its stepwise grind adjustment allows me to fine-tune for different beans and brewing methods, leading to consistently better shots. Additionally, a digital kitchen thermometer is indispensable for monitoring water temperature, which directly impacts extraction quality. I trust the ThermoWorks ChefAlarm for its accuracy and durability, helping me maintain optimal brewing temperatures at all times. For cleaning, I use a dedicated espresso machine maintenance kit that includes descaling solutions and brushes, preventing mineral buildup and ensuring smooth operation. Regularly inspecting and calibrating your equipment minimizes issues like clogs or uneven grind retention that can compromise flavor over time. Looking ahead, smart diagnostic tools embedded in newer espresso machines may offer predictive maintenance alerts, saving time and costs in the future. Ever wondered how to keep your machine running flawlessly day after day? Regular cleaning, calibrated settings, and quality tools are your best friends. For deeper insights on calibrating grinders effectively, check out [Espresso Grinder Essentials](https://superautomatic.espressotechguide.com/espresso-grinder-essentials-boost-your-coffee-flavor-today). Don’t hesitate—try adjusting your grind size by one step today using your trusty grinder and notice the difference in shot quality. Maintaining your gear isn’t just about longevity; it’s about elevating every cup.
Lessons That Changed My Approach to Frothing Oat and Pea Milk
One of the biggest revelations I had was realizing that achieving perfect foam isn’t just about the frother; it’s about understanding your milk’s unique qualities and how they interact with your device. I used to push my machine to its limits, expecting dairy-like foam from plant-based milks, but often ended up with disappointment. The breakthrough came when I learned that patience, precise temperature control, and stirring techniques matter more than I thought. Small details like pre-warming my milk and adjusting frother depth have made my lattes consistently creamier, inspiring me to share this knowledge.
I also discovered that even premium automatic milk frothers have limitations, which can be overcome with minor tweaks. Regular maintenance and calibration, combined with choosing the right milk temperature, transformed my experience. It’s tempting to believe that expensive equipment will do all the work—trust me, that’s a myth. The real secret is in understanding the science behind frothing and adopting a tailored approach that respects your milk’s characteristics.
My Favorite Resources That Elevated My Frothing Game
- Mastering Automatic Milk Frothers: This guide offers practical tips rooted in science, helping me troubleshoot and perfect my foam consistently. I recommend it because it combines detailed techniques with troubleshooting advice.
- Barista Techniques for Plant-Based Milks: A comprehensive book that discusses how professional baristas handle alternative milks. It’s invaluable for gaining advanced tips you won’t find in generic tutorials.
- Specialized Thermometers: Investing in a high-quality kitchen thermometer changed everything for me. It’s a game-changer for accurately hitting those ideal temperatures, ensuring stable and silky foam every time.
- Quick hacks for preventing scorched oat milk: These quick fixes helped me avoid common pitfalls and improve my foam quality rapidly.
Your Opportunity: Elevate Your Frothing Skills Today
Remember, mastering plant-based milk frothing is as much about attention to detail as it is about equipment. By applying even a few of these lessons, you can craft silky, stable foam that rivals your favorite coffee shop creations. Don’t be discouraged by initial setbacks—each pour is a step forward in your barista journey. If I can do it with trial, error, and curiosity, so can you. Explore the techniques and tools mentioned, experiment to discover what works best for your setup, and share your progress. Your perfect latte is within reach, and I encourage you to keep pushing your boundaries. What’s been your biggest challenge with plant-based milk frothing? Share your experiences below and let’s troubleshoot together.
![5 Automatic Milk Frothers That Won't Curdle Hemp Milk [2026]](https://superautomatic.espressotechguide.com/wp-content/uploads/2026/03/5-Automatic-Milk-Frothers-That-Wont-Curdle-Hemp-Milk-2026.jpeg)

Emily Carter
Reading through this detailed troubleshooting guide really struck a chord with me because I used to struggle with frothing almond and soy milk, much like the challenges described here with pea and oat milk. The key revelation for me was how critical temperature control and milk freshness are—something I underestimated before. I’ve started using a digital thermometer to monitor my milk temp and let my milk sit at room temperature for a few minutes prior to frothing, which has made a noticeable difference in foam stability and creaminess. It’s surprising how small tweaks like these can elevate your home frothing routine from mediocre to professional-quality. I’m curious, have others found specific milk brands that work better with frothers without needing too many adjustments? Or is it mostly about technique and temperature management? Would love to hear various setup suggestions from fellow enthusiasts—it’s all about experimenting and finding what works best for each unique frother and milk type.