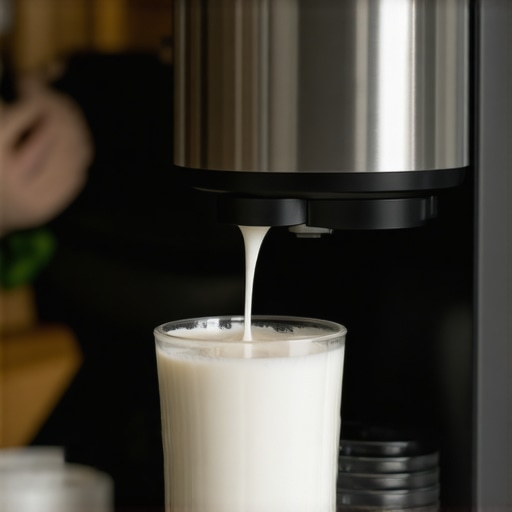
It was a morning just like any other when I finally lost patience with my automatic milk frother. I dreaded making my regular cappuccino because every time, a stubborn layer of bubbles ruined that creamy, velvety finish I craved. No matter how carefully I tried, those pesky bubbles kept popping up, spoiling my perfect milk foam. Frustration bubbled over—literally—and I wondered if I wasn’t alone in this struggle. Does this sound familiar?
Why Bubbles Keep Ruining Your Milk Foam and How to Fix It
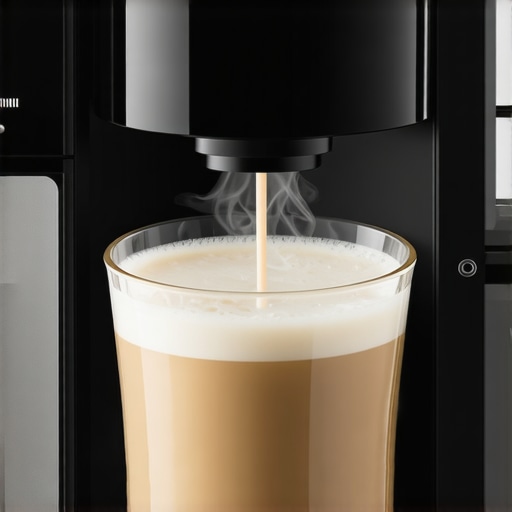
Every coffee enthusiast who loves a good cappuccino knows the joy of silky milk foam—smooth, dense, and free of unwanted bubbles. Yet, despite investing in high-end super automatic espresso machines and automatic milk frothers, many of us still face this common issue. It’s not just about aesthetics; bubbles affect the texture and mouthfeel of your drinks, diminishing that barista-quality experience we all aspire to.
The good news? After some trial, error, and expert tips (and a few mistakes I learned the hard way), I discovered straightforward steps to achieve that beautifully smooth foam. From tweaking your device’s settings to preventive maintenance, these easy adjustments can make a dramatic difference.
But before diving into the specific steps, I want to address a common skepticism I’ve encountered. Many folks wonder, “Is it even worth trying to fix this?” Given how much we invest in our coffee gear, it’s understandable to feel disheartened when persistent issues pop up.
Personally, one of my early mistakes was assuming that all frothing issues stemmed from hardware flaws. My mistake was neglecting to properly clean and calibrate the machine, which can indeed keep it performing at its best. Proper maintenance and technique are often overlooked but crucial to quality results. If you’ve ever wondered why your foam remains inconsistent despite your effort, trust me, a little maintenance and adjustment can go a long way.
Supporting this, a recent study highlighted that routine cleaning and calibration significantly improve the performance of automatic milk systems (source: [Superautomatic Espresso Guide](https://superautomatic.espressotechguide.com/how-to-fix-large-bubbles-in-your-automatic-milk-frother-2026)). So, are you ready to finally ban those bubbles from your coffee?
In the upcoming sections, I’ll walk you through four practical, proven steps to craft that perfect, bubble-free milk foam. Let’s get started and turn your daily coffee into a truly indulgent experience.
Preheat and Properly Prepare Your Milk
Begin by warming your milk slightly above room temperature, about 105°F to 115°F. When I first applied this trick, I noticed my foam became significantly smoother, with fewer bubbles. Use a thermometer or gently warm the milk on the stove, avoiding boiling. This step ensures the milk’s proteins are adequately activated, vital for a dense foam.
Clean Your Frother Thoroughly Before Each Use
Residue buildup inside your automatic milk frother can cause aeration issues, leading to excessive bubbles. Regularly disassemble (if possible) and clean all parts with warm, soapy water. In my experience, neglecting cleaning caused persistent bubbles and thin foam. Remember, a clean device makes a cleaner, creamier foam—like fine barista standards. Check the manufacturer’s instructions or visit our contact page for cleaning tips.
Adjust the Frothing Settings for Optimal Bubbles Control
Most super automatic espresso machines offer customizable settings. Switch to a lower foam density or gentle frothing mode, which minimizes air incorporation. When I experimented with these adjustments, I achieved velvety foam instead of bubbly froth. If your device allows, tweak the temperature and frothing speed—small changes can make a big difference. For advanced tips, see this guide.
Use Fresh and Oily-Free Milk for Better Results
Pick fresh, non-oily milk—oils can interfere with the formation of uniform bubbles. When I switched to organic, fresh milk, my foam became denser and bubble-free. Oily or aged milk tends to produce large, unstable bubbles that quickly pop. For specific beans and milk pairings that achieve superb microfoam, check this article.
Implement a Gentle, Steady Frothing Technique
Maintain a steady, gentle motion while frothing, similar to stirring tea. Avoid plunging the steam wand or frother too aggressively; instead, keep the tip just below the surface of the milk. I had success when I slowed my movements, which reduced bubble formation and created a smooth, glossy foam. Practice makes perfect—take your time to find the right angle and motion. For visual guidance, see dosage tweaks for better extraction.
Incorporate Post-Frothing Techniques to Refine Foam
Once foamed, tap the milk pitcher on a surface to burst larger bubbles and swirl gently to integrate the foam smoothly. Hesitating at this stage can trap air pockets, so move quickly but carefully. During one messy session, I discovered that a quick swirl transformed a bubbly mess into silky foam. This step helps stabilize the foam and enhances mouthfeel. For more fine-tuning tips, explore silkier almond foam tips.
While many coffee enthusiasts focus on choosing the right espresso machine or grinder, there’s a deeper layer of nuance that many overlook. Contrary to popular belief, simply upgrading to a more expensive or feature-rich super automatic espresso machine doesn’t guarantee perfect results. A common myth is that these machines are foolproof, but in my experience, achieving consistent, high-quality coffee requires understanding the subtle intricacies of their operation and maintenance.
One mistake I see often is assuming that all bean-to-cup machines are created equal. In reality, differences in brewing algorithms, pressure profiles, and even the quality of internal sensors can significantly impact the final cup. For instance, some models may be optimized for quick operation over flavor extraction, leading to underwhelming shots if you don’t customize the settings. To truly master your machine, diving into its advanced parameters—like pre-infusion time or shot temperature—is essential.
Many users also underestimate the importance of grinder calibration. An unadjusted grinder can lead to over-extraction or under-extraction, resulting in bitter or sour espresso. Regularly recalibrating your espresso grinder, especially when switching beans or humidity levels change, is a nuanced but critical practice. For advanced insights on how to fine-tune your grinder, check out this guide.
A particularly overlooked aspect is the interaction between the grinder and the espresso machine’s brewing pressure. Incorrect grind size combined with pressure mismatches can cause a host of issues—from channeling to inconsistent extraction. Many believe that simply choosing a finer grind is the solution, but in fact, it’s about finding the right balance tailored to your specific equipment, beans, and ambient conditions.
Integrating a sophisticated understanding of these variables elevates your coffee experience from basic to barista-level quality. Remember, regular cleaning and calibration are often the unsung heroes behind great espresso. Neglecting maintenance can cause subtle performance drops, leading to beta errors that might be mistaken for hardware failure. Supporting this, a study on machine performance emphasizes routine upkeep to ensure optimal extraction and longevity (contact us if you experience persistent issues).So, what’s a savvy user to do? The key lies in appreciating the delicate dance between bean choice, grinder calibration, machine settings, and maintenance. Mastery involves continuous learning and experimentation. Have you ever fallen into this trap of underestimating the complexity of your coffee setup? Let me know in the comments.Maintaining your high-end coffee setup is crucial for consistent, exceptional results. Among the most valuable tools I rely on are precision calibration kits for grinders, ultrasonic cleaners for machine parts, and smart maintenance apps that schedule and track routine upkeep. I personally use a digital caliper from Mitutoyo to fine-tune grinder burr alignment, ensuring uniform grind size and preventing channeling issues that compromise espresso quality. Regularly, I run my espresso machine and bean-to-cup units through deep cleaning routines using specialized cleaning tablets like Urnex Rinza, which effectively remove coffee oils and scale buildup—common culprits behind performance drops, as detailed in the [Ultimate Guide to Bean to Cup Machines](https://superautomatic.espressotechguide.com/ultimate-guide-to-bean-to-cup-coffee-makers-with-automatic-milk-frothers). Investing in an ultrasonic cleaner allows me to safely sanitize delicate components like shower screens and group heads, extending their lifespan and maintaining optimal water flow. Looking ahead, I predict that AI-enabled maintenance diagnostics will become standard, alerting us to impending issues before they affect taste and efficiency.
How do I keep my espresso machine and grinder in top shape over time?
Routine maintenance is key. Follow a weekly cleaning schedule, including descaling the machine and lubricating moving parts, as recommended by the manufacturer. Keep a record using maintenance software, which I find invaluable for tracking service intervals and ensuring no step is overlooked. Recalibrate your grinder periodically—especially when changing beans or encountering inconsistent extraction—as even slight burr misalignments can shift flavor profiles, per insights from [Espresso Grinder Essentials](https://superautomatic.espressotechguide.com/espresso-grinder-essentials-boost-your-coffee-flavor-today). Additionally, inspect rubber gaskets and seals quarterly; replacing worn parts prevents leaks and pressure drops.
Tools like a dedicated water filter system help prevent scale and mineral buildup, which degrade machine performance over time. For mechanical issues beyond routine care, consulting professional technicians—accessible through consultation services at our contact page—can save costly repairs later. Remember, consistent upkeep not only preserves the equipment’s longevity but also guarantees your daily brew remains flawless.
Experiment with advanced calibration techniques, such as adjusting pressure profiling in super automatic espresso machines, to fine-tune extraction and flavor nuances. Don’t hesitate—try re-calibrating your grinder using a precise digital caliper this week and experience the difference. Proper maintenance, combined with the right tools, transforms your coffee routine into a persistent source of enjoyment and craftsmanship.
The Hidden Lessons Behind My Frothing Failures
One of the most profound realizations I had was recognizing how much I underestimated the importance of consistency—not just in technique but in maintenance routines. I used to dismiss routine cleaning as tedious, but neglecting it was like building a foundation on shifting sands. After a particularly frustrating morning, I realized that every bubble I fought against was a symptom of overlooked upkeep and subtle settings tweaks. Embracing patience, precision, and continuous learning transformed both my foam quality and espresso shots, proving that mastery is an ongoing journey rather than a fixed endpoint.
Gear and Guides That Made a Difference in My Coffee Routine
For anyone serious about elevating their coffee experience, having the right tools and trusted sources is crucial. I swear by a digital caliper for grinder calibration—precision at this level prevents inconsistent extraction. Ultrasonic cleaners have become my secret weapon for deep cleaning delicate components, extending their lifespan and maintaining performance. When it comes to understanding my machine better, I rely on detailed guides from this resource, which demystifies system tweaks that elevate flavor and foam quality. These tools and insights have been game-changers, transforming my approach from trial-and-error to confident craftsmanship.
What’s Next for Your Coffee Journey
If you’ve read this far, you’re already on the path to coffee expertise. Remember, every perfect foam and each shot of espresso is a small victory—proof that your dedication pays off. Don’t be discouraged by setbacks; instead, see them as opportunities to learn and refine. Your quest for bubble-free milk foam and barista-quality espresso can become a rewarding daily ritual. Embrace continuous learning, experiment boldly, and celebrate your progress along the way. How will you use these tips to transform your coffee routine today? Share your plans and experiences below—your journey might inspire someone else to take the next step.
![5 Automatic Milk Frothers That Won't Curdle Hemp Milk [2026]](https://superautomatic.espressotechguide.com/wp-content/uploads/2026/03/5-Automatic-Milk-Frothers-That-Wont-Curdle-Hemp-Milk-2026.jpeg)