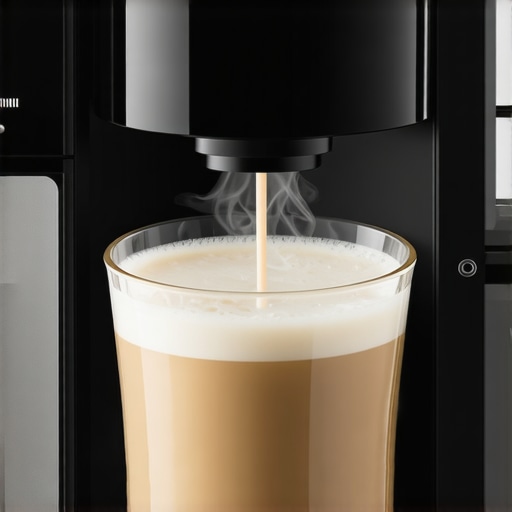
![How to Fix Large Bubbles in Your Automatic Milk Frother [2026]](https://superautomatic.espressotechguide.com/wp-content/uploads/2026/02/How-to-Fix-Large-Bubbles-in-Your-Automatic-Milk-Frother-2026.jpeg)
If you’ve ever brewed a perfect cup of coffee only to be greeted by a cascade of large, unwelcome bubbles in your milk foam, you know the frustration. I vividly remember standing in my kitchen, watching my carefully steamed milk turn into a bubbling mess, feeling like my espresso dreams were slipping away. That lightbulb moment hit me — I wasn’t alone. Many coffee enthusiasts face this bubbling dilemma, especially with the sophisticated automatic milk frothers in 2026 devices. But here’s the truth: you don’t have to accept frothing frustration as part of the process.
Why Big Bubbles Sabotage Your Perfect Espresso Experience
Big bubbles in your milk foam aren’t just an aesthetic flaw; they disrupt that luscious, velvety texture we all crave. The presence of large, uneven bubbles can result from several factors, including improper frothing techniques or equipment quirks. The good news? With a few adjustments, you can banish those stubborn bubbles and elevate your coffee game. Understanding why these bubbles form is the first step — some causes are surprisingly common and easily fixable. According to barista tips shared in Mastering Automatic Milk Frothers, many users inadvertently introduce large bubbles by not pre-heating the milk properly or over-agitating it. I made this mistake early on — rushing the frothing process, leading to those pesky bubbles that seemed impossible to eliminate. That experience taught me that a gentle, deliberate approach is key. So, if you’re tired of seeing your creamy microfoam turn into a bubbly mess, you’re in the right place. Today, we’ll explore proven methods to fix and prevent large bubbles in your froth, making every latte a work of art. Ready to transform your frothing technique? Keep reading — the solution is closer than you think.
Preheat Your Milk Properly
Start by pouring cold milk into your container, then activate your automatic milk frother for a few seconds before actually frothing. This initial warm-up ensures the milk is at the optimal temperature for microfoam formation. I once skipped this step, leading to turbulent froth with large bubbles. After introducing a preheat, the texture improved dramatically, with microbubbles replacing the unwelcome large ones.
Adjust Your Frothing Technique for Finer Bubbles
Hold the espresso machine’s milk wand at a slight angle, just below the surface of the milk, and move it gently in a circular motion. Think of it like coaxing a delicate dance—firm but gentle. Over-agitating creates large bubbles; under-agitating doesn’t incorporate enough air. In my early attempts, I over-swung the wand, causing a bubbly mess. I learned that a slow, consistent circular motion fosters tiny, velvety bubbles, mimicking professional microfoam.
Control the Frothing Temperature
Use your machine’s temperature settings if available, aiming for about 140°F (60°C). Too hot, and the milk proteins break down, leading to flat foam; too cold, and the foam remains unstable. I once took a shot in the dark, ended up with watery foam, then switched over to a calibrated thermometer for precise control. This fine-tuning made large bubbles disappear and produced richer, creamier froth.
Monitor Froth Density During Operation
Watch the visual cues—start with a thin layer of foam, then gradually fill the container. When the milk doubles in volume, turn off the frother. If you notice big bubbles forming early, pause and give the milk a gentle swirl with a spoon or the frother’s top to break up larger bubbles. I used to let it run full blast, ending with a bubbly mess; now, I intermittently stop and stir for smooth microfoam. Practicing this control yields a consistent, silky froth.
Implement Regular Equipment Maintenance
Clean your frother’s nozzle and steam wand after each use because residual milk can cause uneven agitation, promoting large bubbles. I learned this the hard way when a clogged nozzle produced inconsistent froth. Regular cleaning with warm water and a soft brush removes buildup, ensuring proper airflow and consistent microfoam quality. Check your machine’s manual for cleaning intervals or visit contact us for tips on best practices.
Temperature and Timing: The Winning Combo
Timing your frothing process is crucial: start when the milk is just warm, then stop once it reaches desired volume and microfoam texture. Avoid rushing this; patience leads to smaller bubbles and creamier froth. Remember, each machine is different—adjust based on your equipment’s responsiveness. With patience, your frothing becomes consistent, and large bubbles become a thing of the past.
 Many coffee enthusiasts believe that selecting a high-end automatic milk frother or espresso machine guarantees perfect results every time. However, this is a misconception rooted in oversimplification. One common myth is that these machines are completely foolproof, disregarding the importance of nuanced techniques and maintenance. For instance, even the most advanced super automatic espresso machines can produce subpar froth or espresso if user habits are off. The secret lies in understanding the subtleties of equipment setup, such as grinder calibration and milk temperature control, which often go overlooked. Properly maintaining your machine and mastering advanced settings can dramatically improve your coffee quality, as detailed in expert guides like this resource on espresso grinders. Another widespread mistake is underestimating the impact of bean selection; not all beans behave equally across different machines. Dark roasts, oily beans, and recent harvests each require tailored grind sizes and brewing parameters, which is why beginner tips often fall short. An advanced user will experiment with grind adjustments, timing, and temperature to optimize flavor extraction. Additionally, there’s a trap in relying solely on automatic functions without understanding their limitations. For example, automatic milk frothers may struggle with alternative milks like oat or soy, making manual interventions or external tools necessary. To avoid such pitfalls, check out this article about fixing flat foam for deeper insights. Do you ever fall into the trap of thinking high-tech guarantees perfect coffee? Let me know in the comments! Mastering your equipment’s nuances—like calibrating your espresso grinder or controlling milk temperature—aligns with expert advice and can elevate your brewing from good to exceptional. Remember, even the best machines are only as good as the user behind them. So, invest time in learning the intricacies of your setup and avoid common myths that can sabotage your coffee experience.
Investing in quality coffee equipment like a super automatic espresso machine or a bean-to-cup grinder is just the beginning; ongoing maintenance is essential to keep your setup performing at its peak over the years. Proper upkeep not only extends the lifespan of your devices but also ensures consistent, barista-quality results with each brew. Let’s explore the critical tools and practices that will help you maintain your coffee gear effectively, as well as the future trends pointing toward smarter and more durable equipment.
How do I maintain my coffee machine over time?
Regular cleaning is the cornerstone of maintenance. Use manufacturer-approved descaling solutions and clean water filters when prompted—ignore these cues, and you risk mineral buildup that can clog and impair performance. For example, many super automatic machines have dedicated descaling cycles that should be followed meticulously—troubleshooting guides like this resource can walk you through common issues and their solutions.
Additionally, investing in quality cleaning tools like a lint-free cloth, specialized brushes, and calibration kits keeps your equipment sanitary and calibrated for optimal extraction. For grinders, tools such as static reduction brushes and burr alignment gauges can make a significant difference, preventing clumping and uneven grind sizes which directly impact espresso quality.
Furthermore, check seals, gaskets, and hoses periodically for signs of wear or leaks. Replacing these parts proactively prevents costly breakdowns and contamination. Advanced digital maintenance trackers or apps can remind you of scheduled cleaning or calibration dates—these are becoming increasingly integrated into newer models, making maintenance effortless and automated. In the coming years, I predict a shift toward IoT-enabled machines that self-diagnose issues and suggest tailored maintenance steps, reducing manual oversight and ensuring longevity.
What tools do I recommend for long-term care?
For grinder calibration, precision calibration tools are invaluable. They enable you to fine-tune grind settings, which is crucial when switching between bean types or adjusting for humidity changes—common in different seasons. A well-calibrated grinder prevents issues like channeling or uneven extraction, directly affecting flavor and crema quality.
For descaling, innovative products like automatic descaling capsules or concentrate solutions yes, even for traditional machines—are emerging, simplifying the process and reducing chemical use. Investing in good-quality cleaning brushes, like those recommended in this guide, ensures thorough cleaning without damaging sensitive parts.
Moreover, using compatible water filters not only minimizes mineral buildup but also safeguards internal components. As equipment becomes smarter, integrating maintenance history and alerts via companion apps offers a glimpse into a more predictive, self-sustaining future—expect to see even more intelligent maintenance aids becoming standard in premium models.
What future trends will impact long-term maintenance?
The industry is trending toward AI-powered diagnostics and self-cleaning features that actively monitor and address potential issues before they escalate. These advances will reduce downtime and enhance equipment lifespan. More robust materials and modular designs will facilitate easier component replacement—making repairs faster and more cost-effective. As you upgrade or maintain your gear, consider models with these future-proof features. For expert insights, check this article on milk frother maintenance practices. To start embracing these innovations, experiment with upgrading your existing setup with calibration tools and advanced cleaning routines—small steps toward a more sustainable coffee routine that keeps your machine running smoothly for years to come.
The Hardest Lesson I Learned About automatic milk frother,espresso machine,bean to cup,espresso grinder,super automatic espresso
One of the most significant realizations came when I discovered that even the most advanced equipment can’t compensate for poor technique. No matter how expensive your espresso machine or milk frother, inconsistency in maintenance or technique can sabotage your perfect brew. This taught me that continuous learning and attentiveness to detail are essential, especially with systems as intricate as a super automatic espresso machine. Small habits—cleaning nozzles regularly, calibrating grinders properly, or monitoring milk temperature—make a world of difference.
3 Myths About automatic milk frother,espresso machine,bean to cup,espresso grinder,super automatic espresso That Held Me Back
- Myth 1: Expensive gear guarantees perfect results every time. The truth is, skill and maintenance are just as crucial as the machine’s price tag. I found that regular upkeep and understanding your machine’s nuances improve outcomes significantly.
- Myth 2: Automatic functions are foolproof. I once relied solely on auto settings, only to realize manual adjustments during frothing and brewing led to better microfoam and flavor extraction.
- Myth 3: Any coffee bean works equally well in all machines. Experimenting with grind size and bean freshness opened my eyes to tailored adjustments for each coffee type, resulting in richer flavors.
What Experts Won’t Tell You About automatic milk frother,espresso machine,bean to cup,espresso grinder,super automatic espresso
Most professionals emphasize that understanding the subtleties of your specific setup—like calibrating your grinder for different beans or preheating your milk—is vital for top-tier results. I learned that investing time in learning about your equipment’s quirks—beyond just following the manual—unlocks more consistent, barista-quality coffee. For instance, adjusting your grinder’s settings or controlling the milk temperature can transform your daily brew from good to extraordinary. You don’t need to be an expert technician; just a few deliberate tweaks can yield significant improvements. If you’re eager to elevate your coffee game, check out this guide for expert tips on mastering your frothing technique and equipment care.
My Favorite Tools for Long-Term Coffee Happiness
For ongoing maintenance, I rely on precision calibration tools found in this resource. Calibrating my grinder regularly ensures consistent grind size, which is crucial for flavor. Additionally, simple cleaning brushes and descaling solutions keep my machines in top shape. Investing in quality water filters and digital maintenance reminders, as discussed in this article, has saved me from costly repairs and flavor disasters. Looking ahead, I anticipate more IoT-enabled devices that can monitor and self-maintain, making coffee care easier for enthusiasts like us.
Don’t Just Dream—Take Your Coffee to the Next Level Today
Embarking on your journey toward consistently stunning coffee might seem daunting at first, but the rewards are worth every effort. Remember, mastery doesn’t happen overnight—it’s about tiny daily improvements and curiosity. Your super automatic, espresso grinder, or bean-to-cup machine is only as good as the knowledge you bring to it. So, dive into the details, experiment with settings, and keep your gear meticulously maintained. That way, each cup you pour reflects your dedication and love for coffee. Want to share your own experience or ask specific questions? Leave a comment below—let’s learn together and brew perfection one cup at a time.
![5 Automatic Milk Frothers That Won't Curdle Hemp Milk [2026]](https://superautomatic.espressotechguide.com/wp-content/uploads/2026/03/5-Automatic-Milk-Frothers-That-Wont-Curdle-Hemp-Milk-2026.jpeg)